Beyond pipeline(): Taking the Wheel with from_pretrained
Series: Practical PyTorch · I (Phase I) — Part 7 of 9
pipeline() is wonderful right up until it isn’t. It hands you a label and a score, which is exactly what you want — until the day you want the other scores too, or you want to feed it a thousand sentences efficiently, or you reach for a model that has no pipeline task at all. That’s the day you drop down one level and do the work yourself. It’s less scary than it sounds.
When the fast path runs out
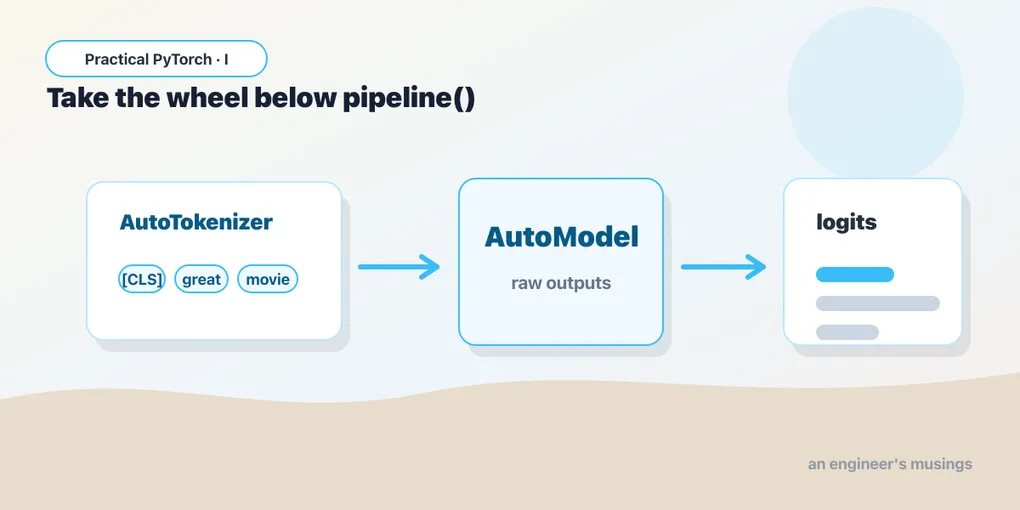
Back in Part 5 we drew the recipe that every model follows: preprocess → forward → postprocess. Turn text (or an image) into tensors, run the tensors through the model, turn the model’s raw numbers back into a human answer. pipeline() did all three steps for you, invisibly, in one line. That’s a feature — most of the time you genuinely don’t want to think about it.
But “invisibly” cuts both ways. A few things pipeline() won’t easily give you:
- The raw scores for every class, not just the winner. Maybe you need the runner-up, or a confidence threshold, or all five star-ratings at once.
- The logits or hidden states, the model’s internal numbers, which you might want to log, compare, or feed somewhere else.
- Batching control — handing the model many inputs at once, your way, for speed.
- A model with no matching pipeline task. Plenty of models on the Hub aren’t wired to any of the named pipelines, so there’s no shortcut to reach for.
When you hit one of these, you stop asking pipeline() to be clever and you run the three steps yourself with the Auto classes. Same recipe. You’re just doing it by hand.
The two pieces: a tokenizer and a model
For text, you need two objects, and you load both with from_pretrained — the same method name you’ll see everywhere in the Hugging Face world. It means “go fetch this thing by name and set it up for me.”
from transformers import AutoTokenizer, AutoModelForSequenceClassification

name = "distilbert-base-uncased-finetuned-sst-2-english"

tok = AutoTokenizer.from_pretrained(name)
model = AutoModelForSequenceClassification.from_pretrained(name)
Two things to notice. First, the Auto prefix: AutoTokenizer doesn’t tie you to one specific tokenizer class. You give it a model name and it figures out the right one to load. Same for the model. You almost never need to know the exact underlying class; the Auto versions read the model’s config and pick correctly.
Second, AutoModelForSequenceClassification is a task class. The ...For... suffix tells transformers what shape of head to put on top of the model — here, a classifier that emits one score per label. There’s a whole family: AutoModelForTokenClassification, AutoModelForQuestionAnswering, AutoModelForCausalLM, and so on. Pick the one that matches the job. (The plain AutoModel, with no For..., gives you just the backbone and its hidden states — useful when you want embeddings rather than predictions.)
The tokenizer and the model are a matched pair. Always load both from the same name. A tokenizer turns words into the exact integer IDs that this model was trained to expect; mix a tokenizer from one model with the weights of another and you’ll get fluent-looking nonsense.
Step 1: preprocess — text to tensors
The tokenizer is the preprocessing step. Hand it a string, ask for PyTorch tensors, and it gives you back a small dictionary:
inputs = tok("I love this", return_tensors="pt")
print(inputs)
# {'input_ids': tensor([[ 101, 1045, 2293, 2023,  102]]),
#  'attention_mask': tensor([[1, 1, 1, 1, 1]])}
return_tensors="pt" is the part people forget. “pt” means PyTorch. Without it the tokenizer hands back plain Python lists, and the model — which speaks only tensors — will refuse them. So: always "pt" here.
The input_ids are your sentence rendered as the integers the model knows. The attention_mask marks which positions are real words versus padding (it’s all ones here because there’s nothing to pad). You don’t have to interpret these by hand — you just need them in the right shape to pass along.
Step 2: forward — run the tensors through
Now the model. The dictionary the tokenizer produced unpacks straight into the model call with **:
import torch

with torch.no_grad():
    logits = model(**inputs).logits

print(logits)        # tensor([[-4.36, 4.68]])
print(logits.shape)  # torch.Size([1, 2]) — one input, two labels
Two habits worth forming. model(**inputs) expands the dictionary into the keyword arguments the model expects (input_ids=..., attention_mask=...) — that’s all the ** is doing. And with torch.no_grad(): tells PyTorch you’re only running the model, not training it, so it can skip the gradient bookkeeping (the autograd machinery from Part 1 that we happily ignore). It’s faster and lighter on memory. There’s no downside for inference, so make it a reflex.
The output object has a .logits field. Logits are the model’s raw, unnormalized scores — not probabilities yet. They can be negative, they don’t sum to one, and on their own they’re hard to read. That’s the next step’s job.
Step 3: postprocess — logits to a human answer
Two small operations turn those raw numbers into something you’d show a person. Softmax squashes the logits into probabilities that sum to 1, and id2label maps the winning position to its name:
probs = logits.softmax(dim=-1)
print(probs)  # tensor([[1.19e-04, 9.999e-01]])

label = model.config.id2label[probs.argmax().item()]
print(label)  # POSITIVE
dim=-1 means “softmax across the last dimension” — the row of label scores. probs.argmax() finds the index of the highest probability, .item() pulls it out of the tensor as a plain Python int, and model.config.id2label is a dictionary the model carries with it — {0: 'NEGATIVE', 1: 'POSITIVE'} for this one — that says what each index means. You never hard-code label names; the model tells you.
And that’s the whole thing. Three steps, no magic:
inputs = tok("I love this", return_tensors="pt")          # preprocess
with torch.no_grad():
    logits = model(**inputs).logits                       # forward
label = model.config.id2label[logits.softmax(-1).argmax().item()]  # postprocess
This is exactly what pipeline("sentiment-analysis") did in Part 6 — it just hid all three lines behind one call. The difference now is that probs is sitting right there in your hands, so you can read every class score, set your own threshold, or batch a hundred sentences through at once.
The same recipe for vision
Images follow the identical pattern — only the preprocessing tool’s name changes. Instead of a tokenizer you use an image processor, which resizes and normalizes a picture into the tensor the model expects:
from transformers import AutoImageProcessor, AutoModelForImageClassification

name = "google/vit-base-patch16-224"
processor = AutoImageProcessor.from_pretrained(name)
model = AutoModelForImageClassification.from_pretrained(name)

inputs = processor(images=image, return_tensors="pt")     # preprocess
with torch.no_grad():
    logits = model(**inputs).logits                       # forward
label = model.config.id2label[logits.argmax(-1).item()]   # postprocess
Notice the middle and last steps are word-for-word the same as the text version. (You’ll also meet AutoProcessor, a catch-all that loads the right preprocessor for multimodal models that take both text and images.) Once the preprocess→forward→postprocess shape is in your head, every new model is just a matter of finding which preprocessor and which ...For... class to plug in.
So when do you drop down — and when do you not?
Be honest with yourself here, because hand-rolling is more code to maintain.
Stay on pipeline() when you just want the answer, you’re prototyping, or the default behavior is fine. It handles batching, device placement, and postprocessing competently, and “competently” is usually enough.
Drop down to the Auto classes when you have a concrete reason: you need all the class scores, you want the hidden states or embeddings, you need fine-grained batching or device control, or your chosen model simply has no pipeline task. “It feels more proper to do it by hand” is not a reason — it’s just more surface area for bugs. Reach for the level you actually need and no lower.
Gotchas
- Forgetting
return_tensors="pt". Leave it off and the tokenizer returns Python lists; the model then complains it got the wrong type. The fix is always the same three characters:"pt". - Forgetting
torch.no_grad(). It still works without it, but you waste memory and time tracking gradients you’ll never use. On a big model or a big batch, that’s the difference between fitting in memory and an out-of-memory crash. - Mismatched tokenizer and model. Load both from the same
name. A tokenizer maps words to the specific IDs its model expects; pair the wrong two and you get confident gibberish, not an error. - Treating logits as probabilities. Logits aren’t normalized — they can be negative and don’t sum to 1. Run
softmaxbefore you read them as confidence, or you’ll report numbers that mean nothing. - Hard-coding label names. Don’t assume index 0 is “negative.” Read
model.config.id2label; different models order their labels differently, and some have dozens. - Forgetting the batch dimension.
logitscomes back shaped[batch, num_labels]— that leading1is the single input. When you pass several strings at once, that dimension grows, and yourargmaxneedsdim=-1, not a bareargmax().
What’s next
You can now run any transformers model the manual way — which means you’re no longer limited to the handful of tasks pipeline() knows about. The natural next question is: where do all these models come from, and how do you pick a good one? That’s the Hub.
Next: Part 8 — The Hub and Bigger Models, where we go shopping for models and start running ones too big to take lightly.
Target keyword(s): automodel from_pretrained, huggingface tokenizer, transformers logits softmax.
Comments